這個是舊聞, 本人是在8月11日lwn上得知這個消息, 現在筆錄一下.
SCO和IBM 為了unix 版權問題的官司,
法官最後得出結論是, novell 沒有轉移任何unix及unixware 的版權給SCO,
因此判SCO敗訴.
Blog of Wan Leung (Chris Wong, wanleung)

這個是舊聞, 本人是在8月11日lwn上得知這個消息, 現在筆錄一下.
SCO和IBM 為了unix 版權問題的官司,
法官最後得出結論是, novell 沒有轉移任何unix及unixware 的版權給SCO,
因此判SCO敗訴.
http://firedog.hk/blog/2007/08/08/end-of-firedog/
火狗工房, 一間香港原創遊戲開發公司, 在他的的開發blog中,
宣佈若沒有資金的話, 將會結業.
愛神餐館, 一隻能成功打入日本市場的遊戲,
火狗的成功, 雖然蝕足八年,
但正如他們的blog所說
“能夠創作原創的動畫、漫畫和遊戲,就是我的夢想,就是火狗全體成員的夢想”,
這不只是火狗全體成員的夢想,
亦是我們軟體開發員的夢想,
亦證明香港是有能力開發出好的遊戲.
在此只能衷心希望火狗能支持下去,
繼續出好game.
就算不能支持下去, 亦希望其最後作品是一個成功的作品.
若真的結業,
真香港的損失, 香港又失去一間能開發出高質素遊戲的公司.
唉, 在comic world排隊去買火狗週邊產品及遊戲的情景可能不復存在……可惜可惜.
Need to recompile kernel.
cd /usr/src/sys/i386/conf
cp GENERIC MYKERNEL
Edit the file MYKERNEL and add the line
options QUOTA
Then run the following commands:
/usr/sbin/config MYKERNEL
cd ../compile/MYKERNEL
make depend
make
make install
——
To Enable Quota
Edit the file /etc/fstab and look for the entry, in which the directory /home is mentioned, e.g.
/dev/ad0s1d /home ufs rw 2 2
Add the words userquota and groupquota as follows:
/dev/ad0s1d /home ufs rw,userquota,groupquota 2 2
To enable quota at boot time you have to add the following lines to /etc/rc.conf:
quota_enable=”YES”
check_quotas=”YES”
Reboot the system:
shutdown -r now
After the reboot run the following commands:
quotacheck -a
quotaon -a
Install the setquota-Tool at last:
pkg_add -r setquota
Here is the instruction for running XEN on Debian Etch on Core2Duo 6300 with 2GB Ram.
First, install all the packages that related to XEN.
apt-get install  libc6-xen linux-headers-2.6-xen-686
linux-headers-2.6-xen-vserver-686 linux-headers-2.6.18-4-xen
linux-headers-2.6.18-4-xen-686 linux-headers-2.6.18-4-xen-vserver
linux-headers-2.6.18-4-xen-vserver-686 linux-image-2.6-xen-686
linux-image-2.6-xen-vserver-686 linux-image-2.6.18-4-xen-686
linux-image-2.6.18-4-xen-vserver-686 linux-image-xen-686
linux-image-xen-vserver-686 linux-modules-2.6.18-4-xen-686
linux-modules-2.6.18-4-xen-vserver-686 xen-hypervisor-3.0.3-1-i386
xen-hypervisor-3.0.3-1-i386-pae xen-ioemu-3.0.3-1 xen-tools
xen-utils-3.0.3-1 xen-utils-common bridge-utils iproute sysfsutils
Then, boot reboot the machine and choose the pae kernel to boot.
Next, add the following into /etc/network/interface for the Xen Bridge neteork.
auto xenbr0
iface xenbr0 inet dhcp
bridge_ports eth0
# optional
bridge_maxwait 0
To build a new debian domain:
Configurature /etc/xen-tools/xen-tools.conf collectly such as kernel version and initrd.
Then, run
xen-create-image --hostname=<name_of_DomU> --dir /home/xen/images/debian
Next, configurature
/etc/xen/<name_of_DomU>.cfg
to make sure all the Tag are correct.
Finally, run
xm create test.cfg -c
to run the VM.
As Core2Duo 6300 support VT, we could run Windows under Xen.
To run Windows in Xen,
first, build an image file for windows.
dd if=/dev/zero of=/home/xen/images/WinXP.img bs=1M count=4096
Next, copy the Windows XP install CD in to an iso format
dd if=/dev/cdrom of=/home/xen/cds/winxp.iso
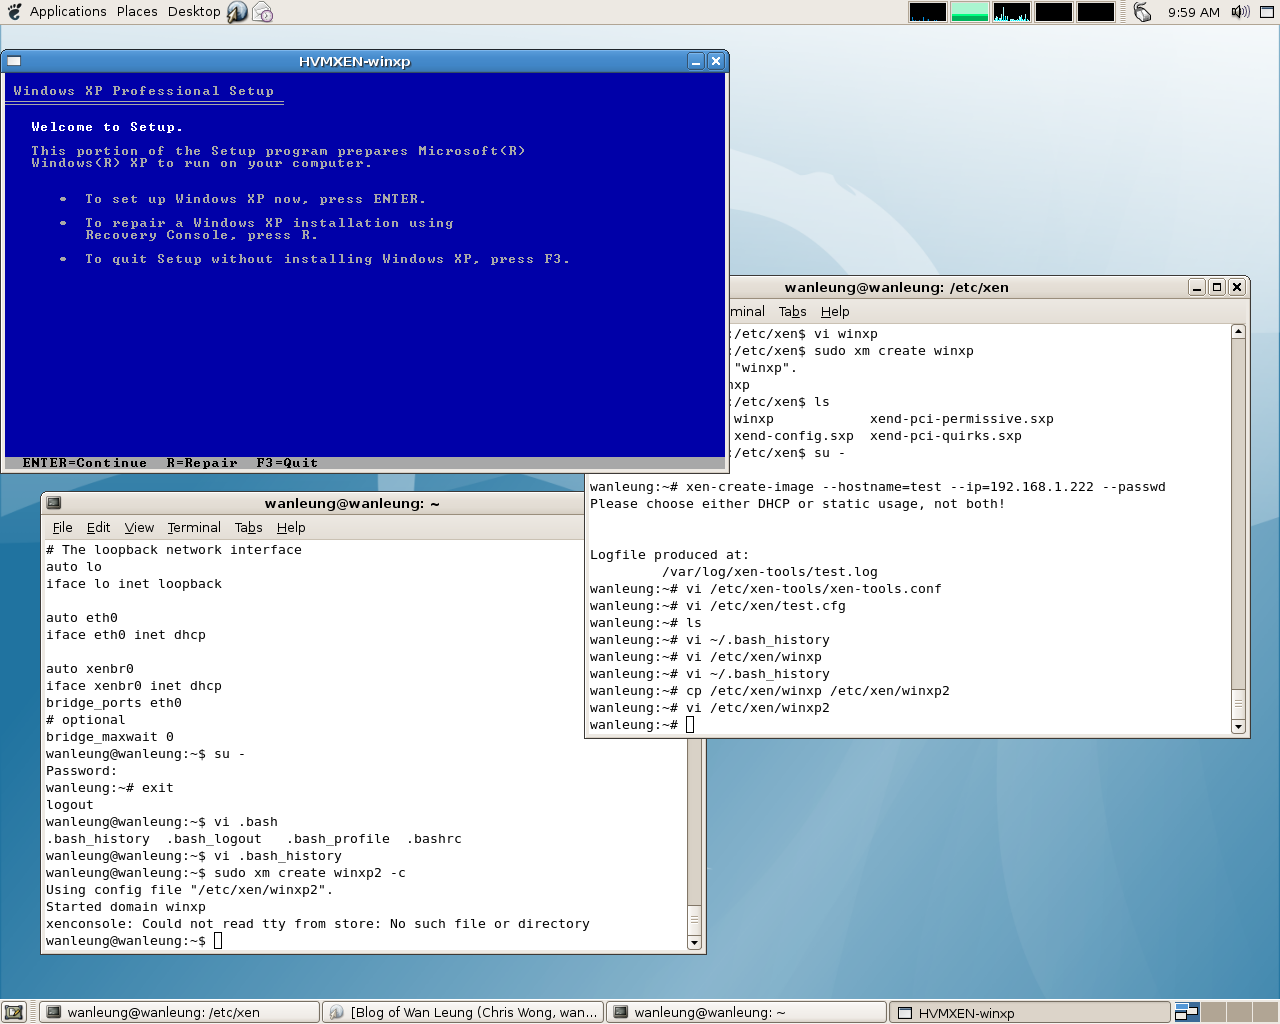
Then, build a winxp config file in /etc/xen as the following. eg:
vi /etc/xen/winxp
kernel = "hvmloader"
builder='hvm'
memory = 512
name = "winxp"
vif = [ 'type=ioemu, bridge=xenbr0' ]
disk = [ 'file:/home/xen/images/WinXP.img,ioemu:hda,w',
'file:/home/xen/cds/winxp.iso,hdc:cdrom,r' ]
#cdrom = '/dev/hda'
device_model = 'qemu-dm'
boot="dc"
sdl=1
vnc=0
nographic=0
localtime=1
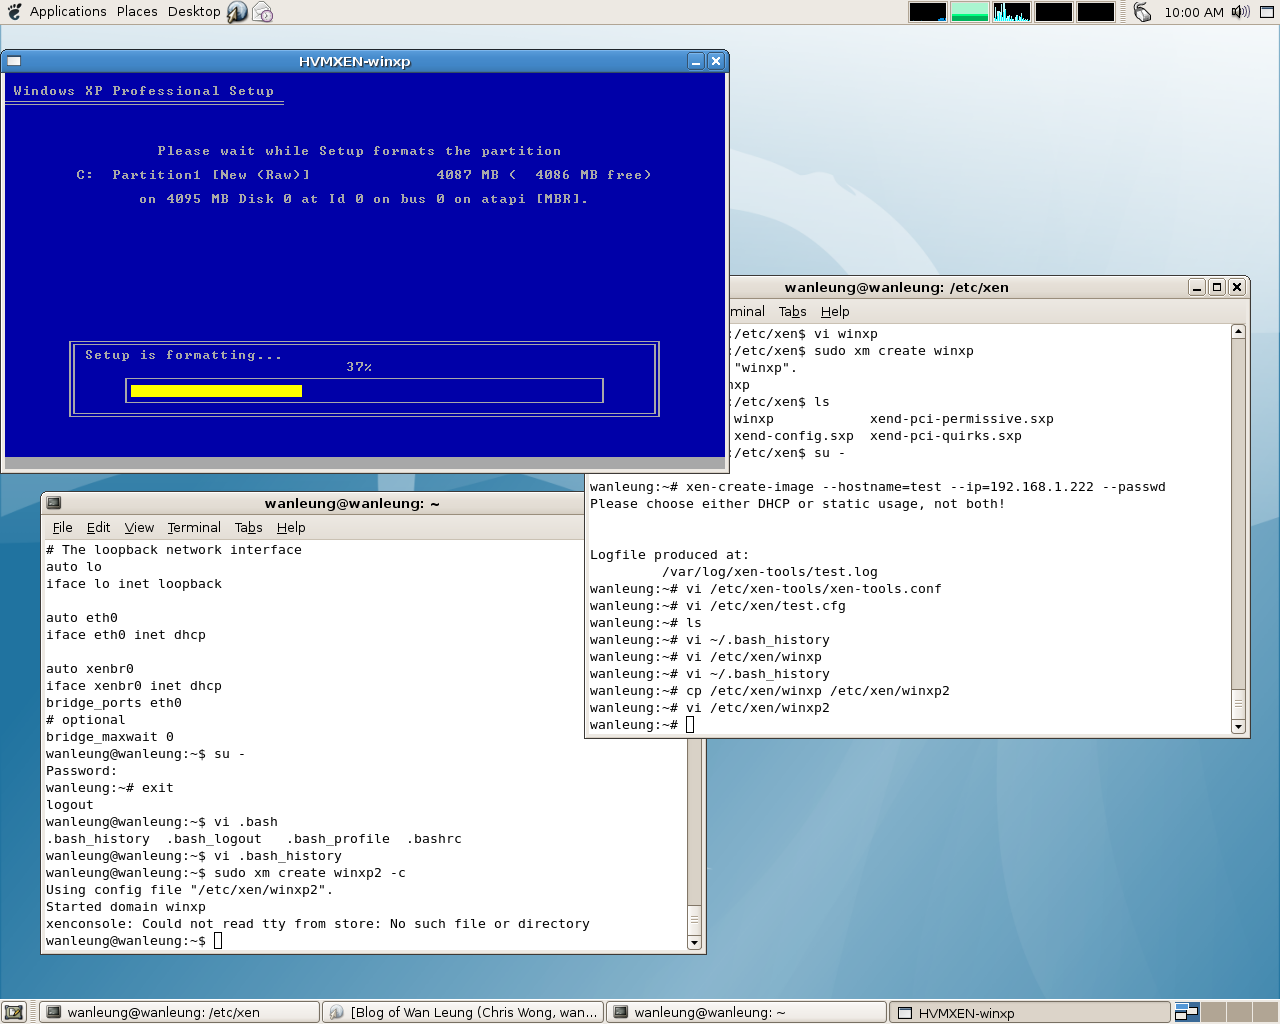
Run
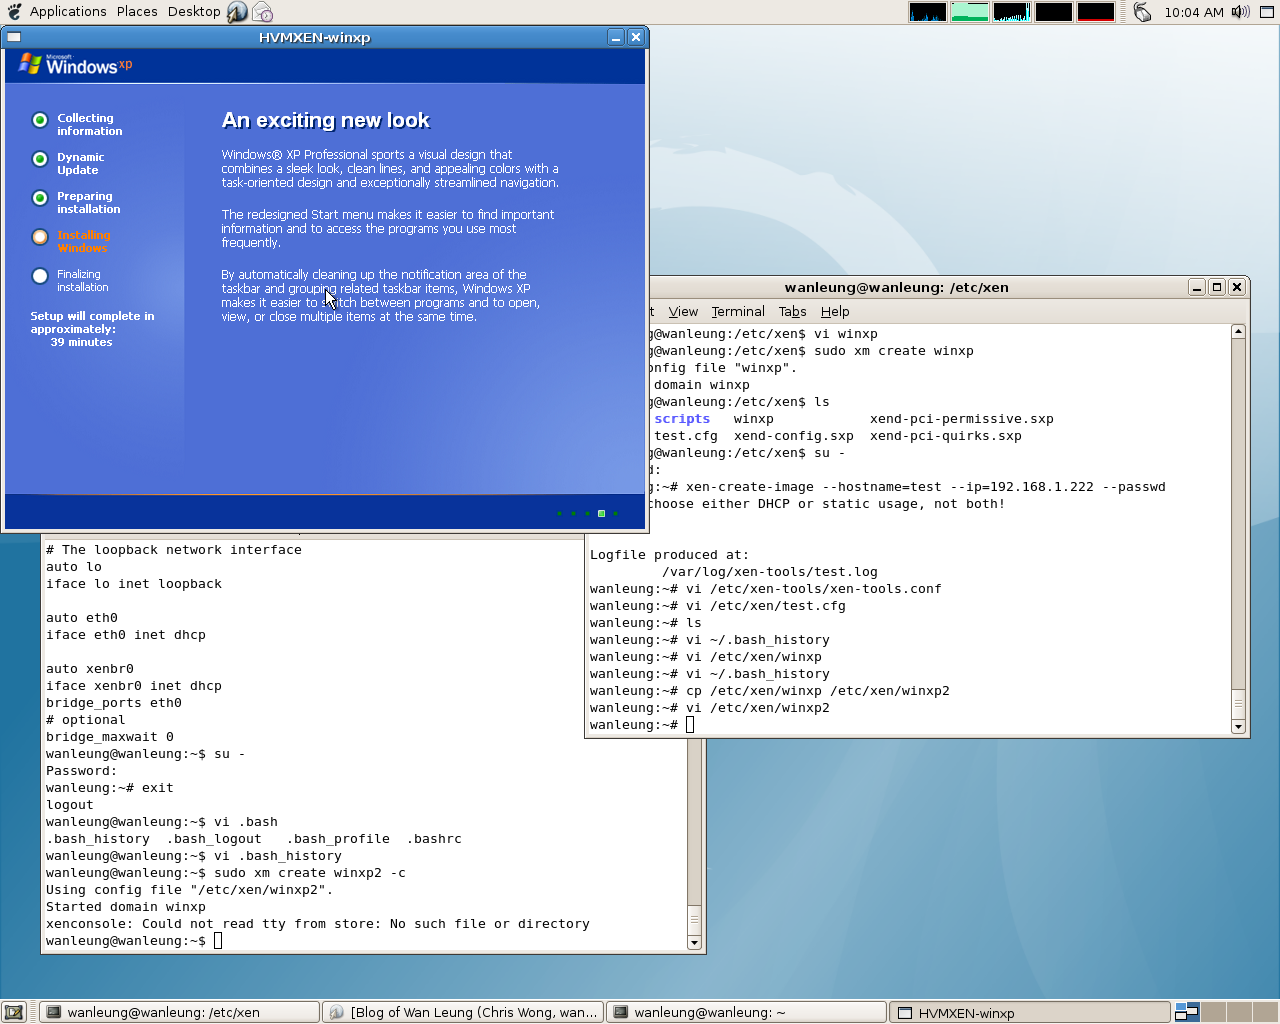
xm create winxp -c
to boot up the VM and install XP.
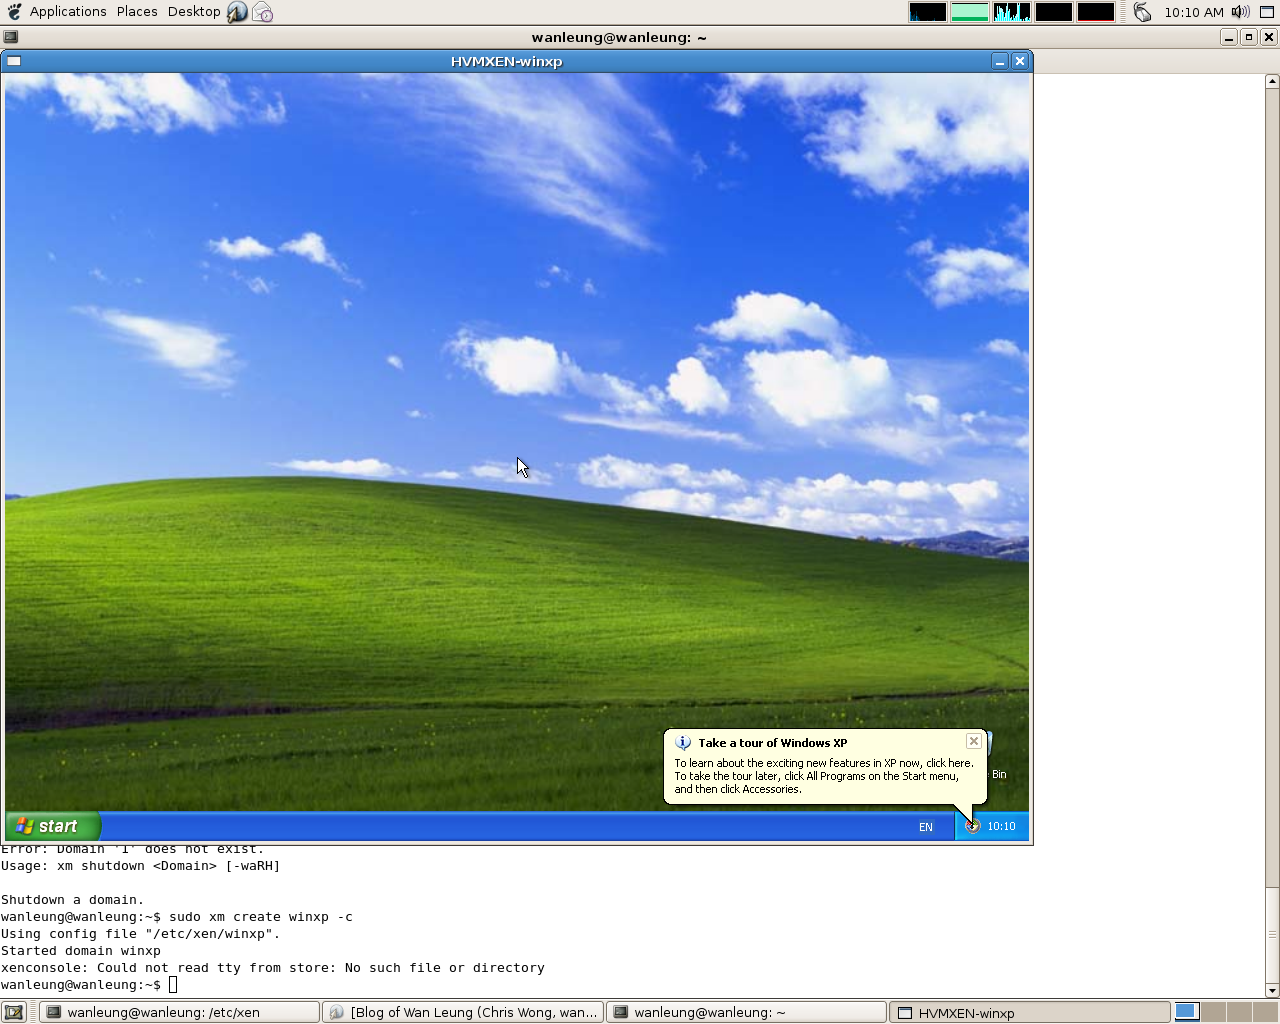
After finished installing the XP, turn off the VM and
change the
boot="dc"
to
boot="c"
in
/etc/xen/winxp
The source is now on Github: https://github.com/wanleung/self-signed-certificate-generator
While the Debian apache2 package was in Apache version 2.0, there was a tool called “apache2-ssl-certificate” for the users to use that script to gererate their own self-signed cert themselves. However, the script was removed since the apache2 package had been upgraded to Apache v2.2.
I had modified the old script so that it can generate a suitable self-signed cert for the new apache2(Apache v2.2) in Debain.
Here is the code:
#!/bin/sh -e DAYS="365" CERTPATH="/etc/apache2/ssl" CERTNAME="apache" KEYBIT="1024" FORCE="0"; usage(){ echo "This is a program for the users to gernate their own self-signed certificate." echo echo "Usage: $0 [[OPTION] [VALUE]]..." echo echo "OPTIONS:" echo " -h | -help | --help -- To Show This Help" echo " -f | --force -- Force to generate the cert" echo " -d | -days | --days -- cert to expire after x days, default is 365" echo " -p | -path | --path -- Path of the cert will be stored," echo " default is /etc/apache/ssl" echo " -n | -name | --name -- the name of the cert, default is apache" echo " -b | -bit | --bit -- length of the key, default is 1024" echo } createcert() { if [ "$FORCE" != "1" -a -f $CERTPATH/$CERTNAME.pem ]; then echo "$CERTPATH/$CERTNAME.pem exists! Use \"$0 --force.\"" exit 0 fi echo echo creating selfsigned certificate echo "replace it with one signed by a certification authority (CA)" echo echo enter your ServerName at the Common Name prompt echo echo If you want your certificate to expire after x days call this programm echo with "--days x" mkdir -p "$CERTPATH/" export RANDFILE=/dev/random openssl req $@ -new -x509 -days $DAYS -nodes -newkey rsa:$KEYBIT -out $CERTPATH/$CERTNAME.pem -keyout $CERTPATH/$CERTNAME.pem chmod 600 $CERTPATH/$CERTNAME.pem } case $1 in -h|help|--help) usage exit 0 ;; esac until [ -z "$1" ] # Until all parameters used up . . . do case $1 in --force|-f|-force) FORCE="1" shift ;; --days|-d|-days) DAYS=$2 shift shift ;; --path|-p|-path) CERTPATH=$2 shift shift ;; --name|-n|-name) CERTNAME=$2 shift shift ;; --bit|-n|-bit) KEYBIT=$2 shift shift ;; *) usage exit 0 ;; esac done createcertHere is the file.
apache2-ssl-certificate.tar.gz
MD5SUM: 6fb69eb0d63a683e73461f4f682e13e5
You could get the project from github.
The source is now on Github: https://github.com/wanleung/self-signed-certificate-generator